NOTE: To view any image in more detail, right click and select Open image in new tab.
Table of Contents
- Installation of 3rd-Party Tools
- Tool Demonstration Videos
- WAVE
- Screen Resolution Tester
- Keyboard Navigation
- Keyboard Navigation (Mac)
- NVDA
- JAWS
- Read&Write
- VoiceOver (Mac)
- Adobe Acrobat Pro
- Adobe Key Shortcuts
- Apple Zoom Key Shortcuts
Installation of 3rd-Party Tools
Several 3rd-party tools are required to complete the tests in Modules 1-4. Read more about how to use and install each tool below.
Tool Demonstration Videos
The LEAP Training Series YouTube playlist contains short demonstration videos for some 3rd-party tools:
- Alt-text Assessment Using WAVE
- Colour Contrast Test Using WAVE
- Assessing Heading Structure Using WAVE
- Assessing Keyboard Navigation
- Non-extractable PDF Assessment
- Screen Reader Basics: NVDA
WAVE
WAVE extension allows you to evaluate web content for accessibility issues directly within Chrome and Firefox. WAVE can identify many accessibility and Web Content Accessibility Guideline (WCAG) errors, but also facilitates human evaluation of web content.
Installing WAVE
WAVE is a Google Chrome or Firefox extension. Once it has been downloaded, a small W button will appear in your Chrome or Firefox browser on the top right-hand corner.
Using WAVE
-
Navigate to an eresource you would like to test, login and select the appropriate page for testing (main page, results page etc)
-
Click on the W extension button that appears in the top right-hand corner of your browser. To exit the WAVE report, click the “W” extension button again

-
Start by reviewing the results summary that appears on the left-hand side (see image on the left, below)
-
Select the Details tab for more information (see image on the right, below). All accessibility errors, alerts, features, and structural elements found by the WAVE tool will be listed here under relevant subheadings. They will also be flagged/indicated on the webpage. Click on the icons listed in the Details sidebar to navigate to that element within the page (see image on the right, below).
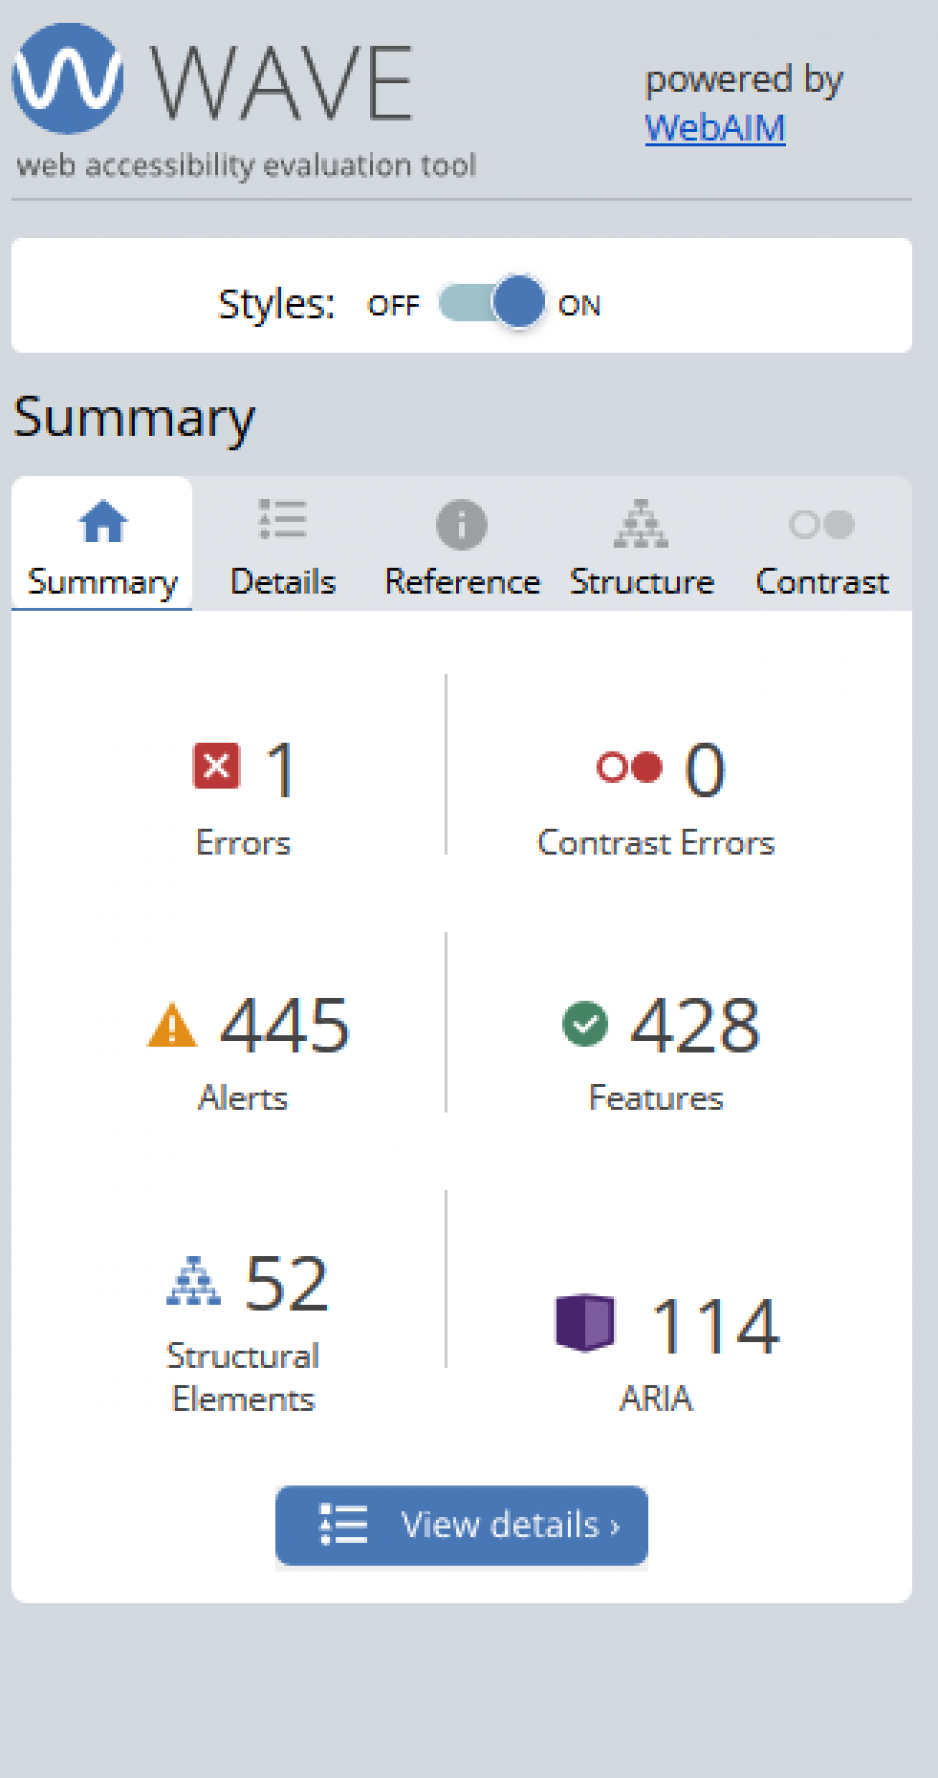
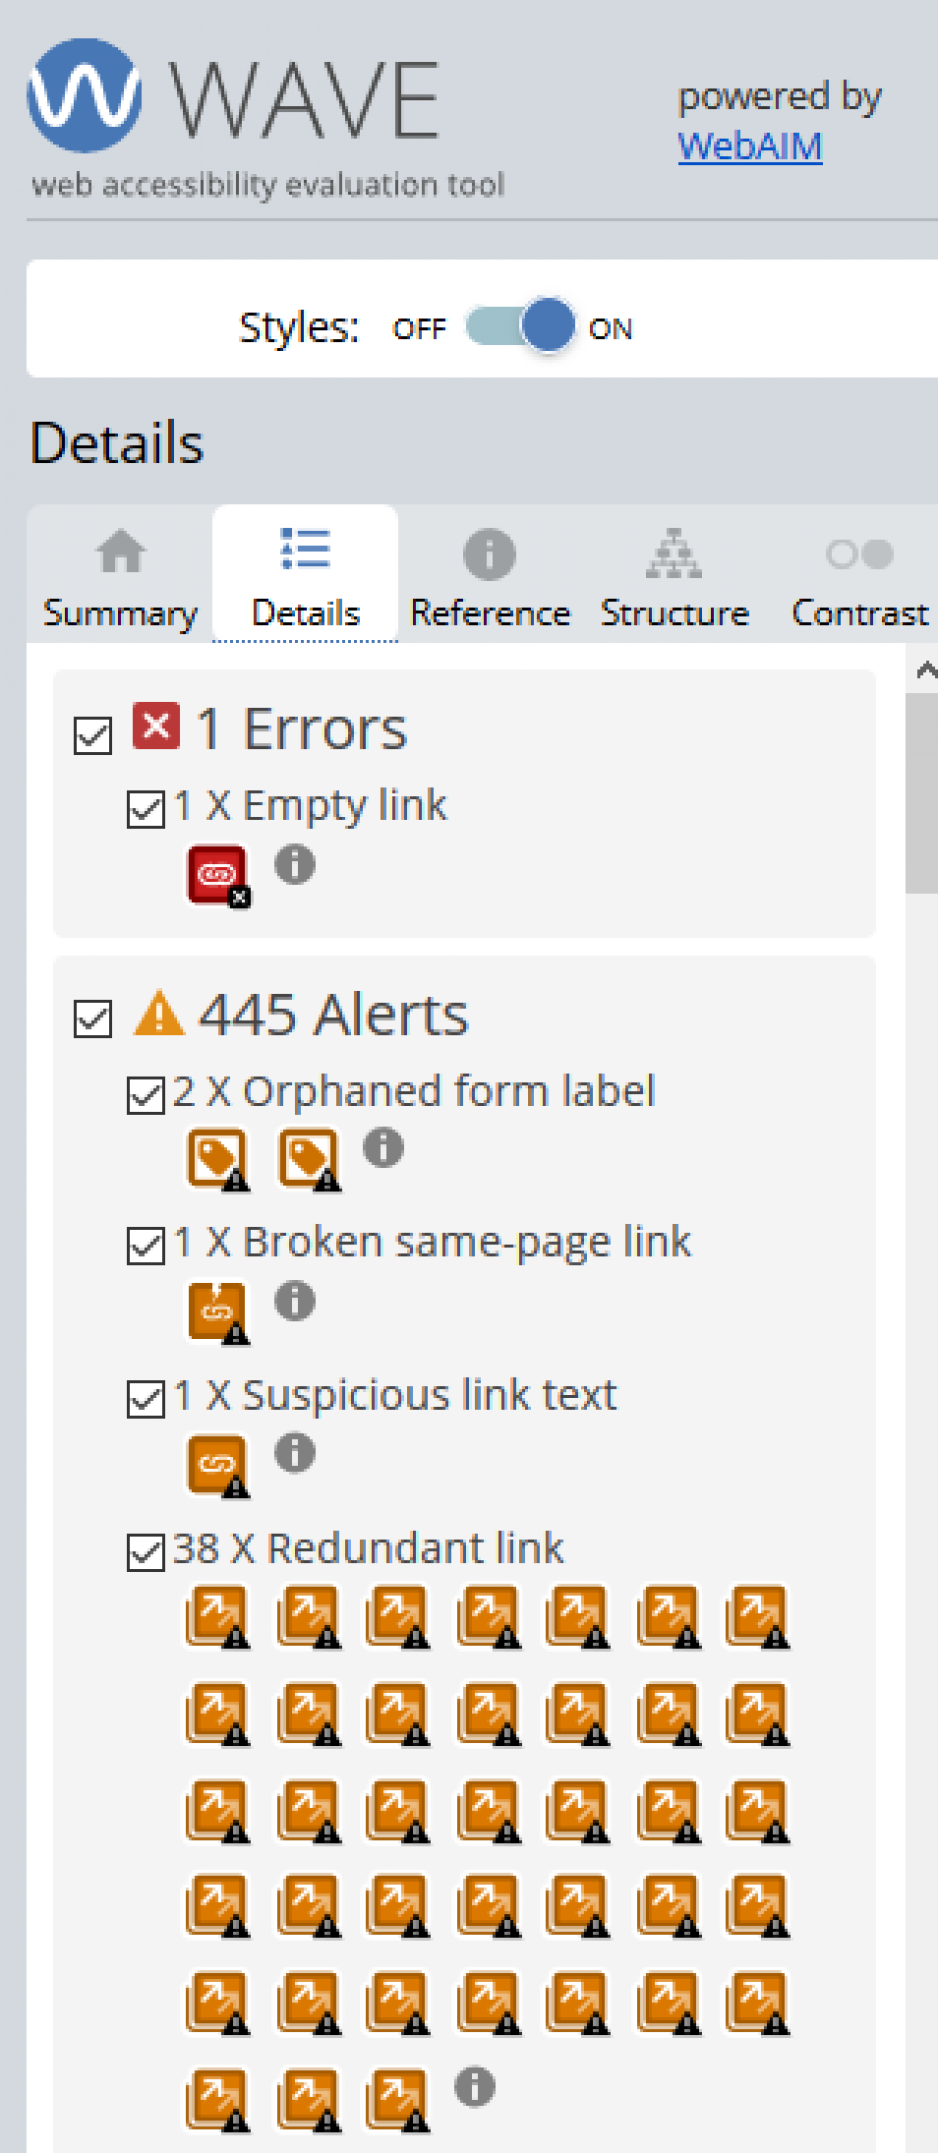
-
During your assessment, you will be asked to click on the Structure and Contrast tabs to assess the heading structure of the web page and the colour contrast of text on the web page. Please refer to Colour Contrast Test Using WAVE and Assessing Heading Structure Using WAVE videos for more detailed instructions.
Please note: The absence of errors DOES NOT mean your page is accessible or compliant. WAVE brings the underlying accessibility information of a page to the fore-front so it can be easily evaluated in context.
Further Support
https://dap.berkeley.edu/testing/how-use-wave-evaluation-tool
https://www.youtube.com/playlist?list=PLHswZWNDGz4OhdhHpGAY8wflD0Csv_QEF
https://wave.webaim.org/ https://www.youtube.com/watch?v=ITUDiTgAZY0&t=208s
Screen Resolution Tester
Chrome Extension Options:
Edge Extension Options:
Firefox Instructions:
-
Menu > More Tools > Web Developer Tools (or Ctrl + Shift + I)
-
Responsive Design Mode (or Ctrl + Shift + M)
-
Manually enter pixels / resolution sizes you would like to test
-
Desktop resolutions: 1920x1080, 1366x768, 1440x900
-
Mobile resolution: 360x800
-
Tablet resolution: 768x1024
-
Keyboard Navigation
Instructions for navigating through menus using keyboard navigation
- Note that you may wish to practice keyboard navigation skills before testing a specific database. A good page to test on is https://webaim.org so that you can get a feel for how keyboard navigation works on a page that is accessible.
- Initiate keyboard navigation by placing cursor in your browser's address bar and then follow the directions below.
- If a menu bar item has focus (usually a small border around the item will show that it has focus) and the menu is not open:
- Enter, Spacebar, and the up down arrow keys opens the menu and places focus on the first menu item in the opened menu or child menu bar.
- Left or right arrow keys moves focus to the adjacent menu bar item.
- When a menu is open and focus is on a menu item in that open menu:
- Enter or Spacebar invokes that menu action (which may be to open a submenu).
- Up or down arrow keys cycles focus through the items in that menu.
- Escape closes the open menu or submenu and returns focus to the parent menu item.
- If the menu item with focus has a submenu, pressing Enter, Spacebar, or the right arrow key opens the submenu and puts focus on the first submenu item.
- When a submenu is open and focus is on a menu item in that submenu:
- Up or down arrow keys cycle through the submenu items (behaves the same as open menu).
- Escape or the left arrow key closes the submenu and returns focus to the parent menu item.
- Typing a letter (printable character) key moves focus to the next instance of a visible node whose title begins with that printable letter.
- First item in menu bar should be in the tab order.
- Disabled menu items receive focus but have no action when enter or left/right arrow is pressed. It is important that the state of the menu item be clearly communicated to the user.
- Tabbing out of the menu component closes any open menus.
- With focus on a menu item and a sub menu opened via mouse behavior, pressing down arrow moves focus to the first item in the sub menu.
- With focus on a menu item and a sub menu opened via mouse behavior, pressing up arrow moves focus to the last item in the sub menu.
- With focus on a submenu item, the user must use arrows or the Escape key to progressively close submenus and move up to the parent menu item(s).
- At the top level, Escape key closes any sub menus and keeps focus at the top level menu.
There are three types of navigation systems which use drop down menus:
- Full tab, where the user tabs through the main navigation menu and all the drop-down options for each item.
- Tab and arrow, where a combination of tab and arrow keys can be used to move between items in the main navigation menu and the drop-downs
- Tab and enter, where the main navigation item is not a link and you can tab from main item to main item. When enter is selected on a main item the drop-down is presented and the tab key or arrow key is used to move between the choices.
To activate a choice within a drop-down menu, use the spacebar or enter key
To move out of the drop-down menu without activating a choice, hit the escape or tab key
Keyboard Navigation (Mac)
You will need to ensure that “Full Keyboard Access” is enabled. To do this, go to System Preferences > Keyboard > Shortcuts and check the “All Controls” check box.
NVDA
These are basic instructions for accessing and navigating with NVDA. A comprehensive list can be found in the NVDA Keyboard Shortcuts document by Deque University:https://dequeuniversity.com/screenreaders/nvda-keyboard-shortcuts
- Control + Alt + N: Turn NVDA on
- Insert + Q: Turn NVDA off
- Control: Stop Reading
- Insert + Down arrow OR Numpad + : Start reading continuously from this point on
- Down Arrow: Read next item
- Tab: Read next focusable item (e.g. link, button)
- Enter: Activate Link
- Enter or Spacebar: Activate Button
JAWS
If you have access to JAWS you can use these tests instead of NVDA
Please ensure your speakers are on or your headphones are plugged in. Once JAWS starts, you can minimize the JAWS window and open the PDF document you intend to test. JAWS will notify you if the PDF document is untagged.
The following JAWS keyboard shortcuts can be used to navigate your document
- Insert + Down Arrow: say all text
- Page up/Page down: Increase/decrease voice rate during say all reading
- Ctrl: Stop reading
- Up arrow/Down arrow: Prior line/next line
- Left/right arrow: Previous/next character OR Rewind/Fast forward during say all reading
- F5/Shift+F5: Page refresh/Hard refresh to start over
- Tab: Skips to the next link or form element
- Shift + Tab: Reverses to the previous link or form element
- H: Skips to the next heading
- N: Skips to the next non-link text
- T: Skips to the next table
- 1-6: skips to respective heading levels, H1 to H6
Read&Write
Read and Write is a literacy support tool that offers learners help with everyday tasks like reading text out loud, understanding unfamiliar words, researching assignments, and proofreading written work.
Read&Write For Google
-
Open Google Chrome and navigate to the Chrome Web Store.
-
Enter "read and write" in the search box in the top left corner of the page.
-
Locate “Read&Write for Google Chrome” under extensions, then select the Add to Chrome button.
-
Select the Add extension button in the pop-up window near the Chrome address bar.
-
Click on the Read&Write icon (a purple puzzle piece) in the top right corner of Chrome.
-
After being prompted to sign in to your Google account, select the Allow button.
Read&Write For Windows With Microsoft Edge
-
Open Read&Write go to Read&Write settings > Show more settings > About Read&Write.
-
Check that the version of Read&Write in the About box is 12.0.59 or above. If the version is below 12.0.58, click on the Check for updates link to download and install available updates.
-
Open Microsoft Edge. A tab will open with the Support for Read&Write Desktop extension. Click on the button at the top of the window to Allow extensions from other stores.
-
4. A message will be displayed asking if you want to allow extensions from stores other than the Microsoft Store. Click Allow.
-
5. You will now be able to add extensions from the Chrome Store to Microsoft Edge. Click the Add to Chrome button.
-
A message will be displayed asking if you want to add Support for Read&Write Desktop to Microsoft Edge. Click Add Extension
-
Read&Write for Windows is now ready to be used with Microsoft Edge.
Further Support
https://academy.texthelp.com/read-and-write-education/introduction/
VoiceOver (Mac)
|
To Turn VoiceOver ON |
|
|
Press |
Command + F5 |
|
If device supports Touch ID (electronic fingerprint recognition feature) |
Press it quickly 3 times |
|
By using Siri (digital assistant that is part of Apple’s operating systems) |
Say “Turn VoiceOver ON” |
Keyboard accessibility is NOT enabled by default on Mac
-
System Preferences: Keyboard > Shortcuts > Use keyboard navigation to move focus between controls.
-
Safari Preferences: Advanced > Accessibility > Press Tab to highlight each item on a webpage.
Enter VoiceOver Commands
-
VoiceOver commands allow you to navigate and interact with what’s on the screen.
VoiceOver activation keys
-
Press VoiceOver modifier / VO + another key
-
By default, you can use Caps Lock / Control + Option as the VO modifier
Hear the names of keys you press
-
Press VO + K to start or stop keyboard help
Screen Navigation / VoiceOver Cursor
-
Use the VoiceOver cursor (VO cursor) to move around the screen
-
The cursor appears onscreen as a rectangular outline around an item.
|
Navigate the screen |
|
|
To move VO cursor |
VO + the Up/Down/Left/Right Arrow keys |
|
To click button or select checkbox |
VO-Space bar |
|
VoiceOver General Commands |
|
|
Start or stop VoiceOver |
Command + F5 |
|
Start reading from the top (“Read All”) |
VO + A |
|
Stop / pause / resume reading |
CTRL |
|
Read next item |
VO + Right Arrow |
|
Read previous item |
VO + Left Arrow |
|
Read a paragraph |
VO + P |
|
Read a line |
VO + L |
|
Read a sentence |
VO + S |
|
Read next sentence |
VO + Command + Page Down |
|
Read previous sentence |
VO + Command + Shift + E |
|
Read a word (press W multiple times to spell words alphabetically and phonetically) |
VO + W |
|
Read from top to current location |
VO + B |
|
Jump to top of page (using desktop keyboards) |
VO + Home |
|
Jump to top of page (using laptop keyboards) |
VO + Fn + Left Arrow |
|
Jump to bottom of page (using desktop keyboards) |
VO + End |
|
Jump to bottom of page (using laptop keyboards) |
VO + Fn + Right Arrow |
|
Activate link |
Enter or VO + Space Bar |
|
Activate button |
Enter or Space Bar or VO + Space Bar |
|
Repeat last spoken phrase |
VO + Z |
|
Go to next heading |
VO + Command + H |
|
Go to previous heading |
VO + Shift + Command + H |
|
Go to next / previous focusable item |
Tab / Shift + Tab |
|
Move to the next image |
VO + Command + G |
|
Move to the previous image |
VO + Command + Shift + G |
|
Next link |
VO + Command + L |
|
Select speech setting option (speaking rate, voice, pitch, etc.) |
VO + Command + Right or Left Arrow |
|
Modify the selected speech setting |
VO + Command + Up or Down Arrow |
|
Open VoiceOver Online Help |
VO + ? |
|
Open Commands Help menu |
VO + H + H |
Tables Navigation
-
VoiceOver provides several ways to navigate Tables by row and column
|
Navigate Table rows |
|
|
To hear a row header |
press VO + R |
|
To hear a row from the VO cursor to the end of the row |
press VO + R +R |
|
Navigate Table columns |
|
|
To hear a column header |
press VO + C |
|
To hear a column from the VO cursor to the bottom of the column |
press VO + C + C |
|
Move up or down in a column |
press the Up Arrow / Down Arrow key |
Adobe Acrobat Pro
You need to have the Adobe DC Pro software to access the accessibility checker for PDF documents.
If you don’t already have the accessibility icon, you can access it from more tools. Under the Protect & Standardize section, click Add under the accessibility icon and it will be added to the toolbar on the column on the right side of the page.


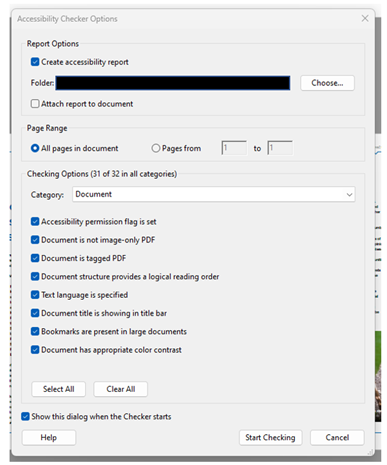
To review the accessibility of PDF documents, click the accessibility check from the secondary panel that appears when clicking the accessibility icon. The accessibility checker options dialog box will appear:
Under checking options, you can decide what categories you want checked for accessibility but clicking the drop-down menu or clicking the Select All button. Then click the Start Checking button at the bottom of the box.
The accessibility checker menu and results will appear in the toolbar in the column on the left.
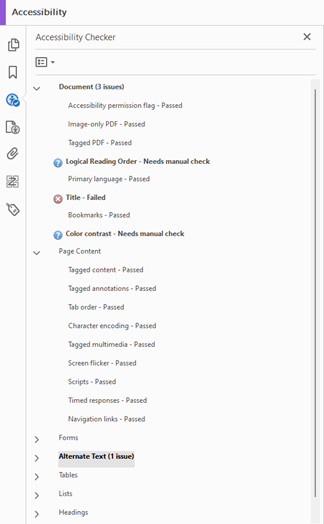
The results of the Accessibility Checker are broken up into 7 categories (Document, Page Content, Forms, Alternative Text, Tables, Lists, and Headings) with a list of rules that are checked. Each rule will receive 1 of 4 statuses: Pass, Fail, Skipped by User, or Needs Manual Check.
If you right-click on the selected rule, you will get a dialog box that will provide the following options (depending on the status): Pass, Fix, Skip Rule, Explain, Check Again Show Report, and Options. Pass will appear for rules where the status requires a manual check. Fix will appear for rules where the status requires manual checks or has failed.

Accessibility Report
You also have the option to create and review the accessibility report for a PDF document by clicking the Accessibility Report icon in the left toolbar underneath the Accessibility Checker icon . The Accessibility Report provides a summary and detailed report of the findings from the accessibility check. The report section contains links to tools and documentation that can help fix the identified problems.
You can save the accessibility report and view it as an HTML file or attach it as a document.
Read Out Loud
The Read Out Loud feature allows you to listen to the document. To activate this feature:
-
Click the View menu at the top of the document,
-
Choose Read Out Loud from the drop-down menu,
-
And Activate Read Out Loud (or press Shift+Ctrl+Y).
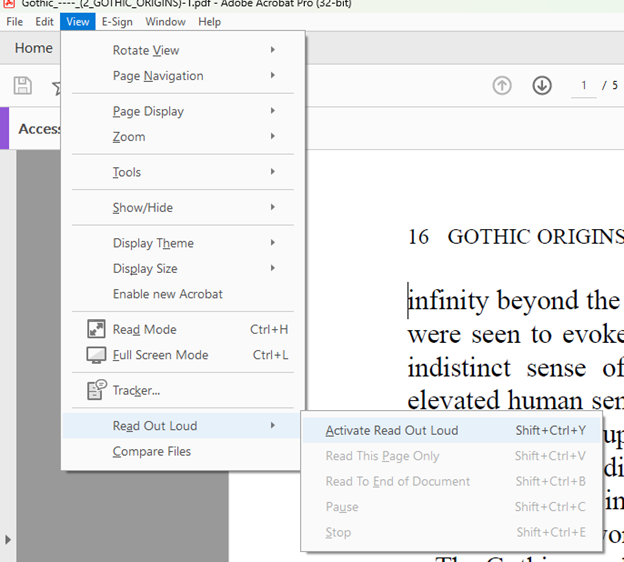
By clicking on Read to the End of the Document (Shift+Crtl+B), the Read Out Loud feature will begin reading the text from the beginning.
You can also select for this feature to Read This Page Only (Shift+Crtl+V).
You can also Pause (Shift+Crtl+C) or Stop (Shift+Crtl+E).
To turn this feature off:
-
Click the View menu at the top of the document,
-
Choose Read Out Loud from the drop-down menu,
-
And Deactivate Read Out Loud (Shift+Ctrl+Y).
Preferences
You can change preferences (Crtl+K) for the Read Out Loud feature by:
-
Selecting the Edit menu at the top of the document,
-
Choosing Preferences,
-
Choose Reader in the dialog box that appears.

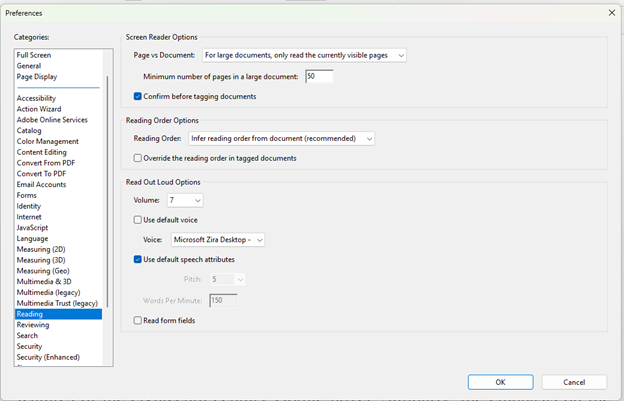
Here you will have Read Out Loud Options such as volume, changing the voice. Pitch, and words spoken per minute.
You also can select preferences for Screen Reader Options and Reading Order Options.
Set Alternative Text
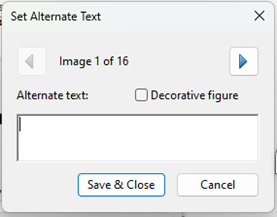
The Alternative Text feature allows you the option to add alt text to images, graphs, figures, and tables. You can use this feature if the PDF if the alt text is not already included or if you reset the reading order.
Reading Option and Order
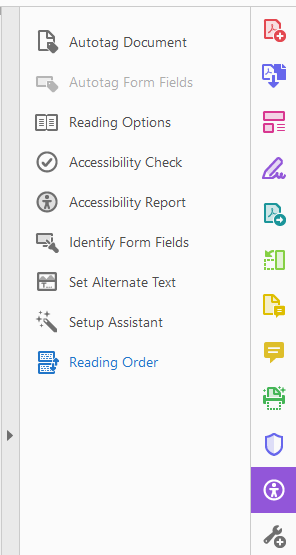
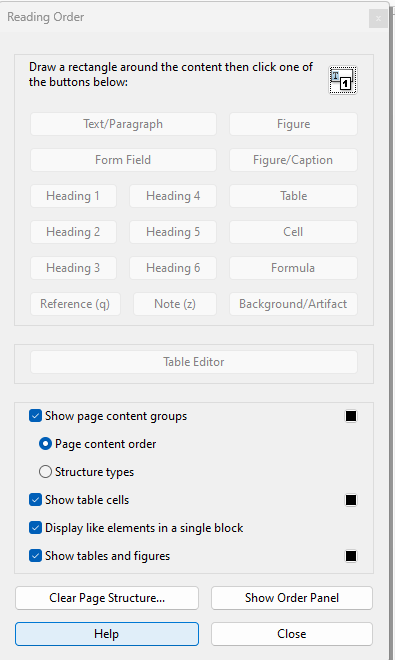
The Reading Order tool allows you to adjust and fix the reading order of PDF documents. You can use the Reading Order tool to create tags in untagged documents and add new tags.
You can access this feature in the Accessibility panel. You can also clear the page structure or show the order structure that exists within the document.
Document Properties
To see if a PDF is locked, you can check the document properties:
-
Select File menu from the top of the page,
-
Choose Properties (Ctrl D),
-
And then look under the Security Tab,
-
Look at the Document Restrictions Summary.
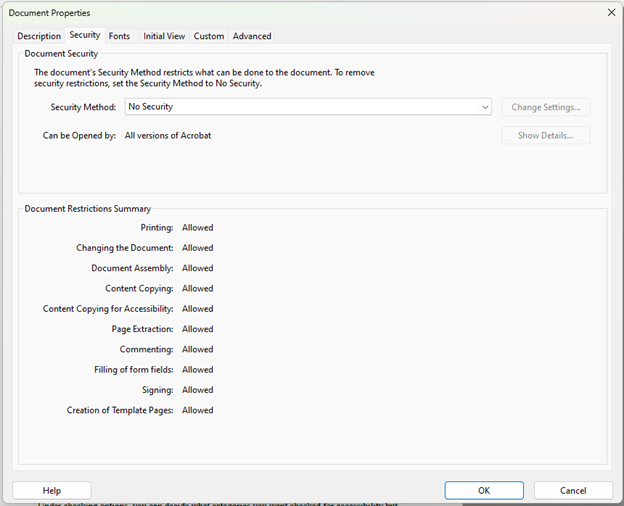
You can also access this menu from Edit, and then Protections.
For more detailed instructions, please visit Create and Verify PDF Accessibility.
Adobe Key Shortcuts
-
Go to the next or previous page: Ctrl + Page down or Ctrl + Page up
-
Go to the bottom or top of a document: Shift + Ctrl + Page down/page up
-
Open preferences dialogue box: Ctrl + K
-
Display document properties, including security settings and tagged status that affect accessibility: Ctrl + D
-
Start accessibility quick check: Shift + Ctrl + 6
-
Save to text: Alt + F and then V
-
Start accessibility setup assistant: Alt + D and then T
-
Place focus on document: F5
Apple Zoom Key Shortcuts
-
Access the Apple Zoom feature under the home button: System Preferences > Accessibility > Zoom
-
Turn on zooming by selecting Command (⌘) + Option (⌥) + F5 and selecting options in the Zoom section.
-
Zoom with keyboard shortcuts
-
To zoom in, press Command (⌘) + Option (⌥) + Equal Sign (=)
-
To zoom out, press Command (⌘) + Option (⌥) + Minus Sign (-)